Generating CSV Files
Islandora Workbench can generate several different CSV files you might find useful.
CSV file templates
Note
This section describes creating CSV file templates. For information on CSV field templates, see the "Using CSV field templates" section.
You can generate a template CSV file by running Workbench with the --get_csv_template argument:
./workbench --config config.yml --get_csv_template
With this option, Workbench will fetch the field definitions for the content type named in your configuration's content_type option and save a CSV file with a column for each of the content type's fields. You can then populate this template with values you want to use in a create or update task. The template file is saved in the directory indicated in your configuration's input_dir option, using the filename defined in input_csv with .csv_file_template appended.
The template also contains three additional rows:
- human-readable label
- whether or not the field is required in your CSV for
createtasks - sample data
- number of values allowed (either a specific maximum number or 'unlimited')
- the name of the section in the documentation covering the field type
Here is a screenshot of this CSV file template loaded into a spreadsheet application:

Note that the first column, and all the rows other than the field machine names, should be deleted before you use a populated version of this CSV file in a create task. Also, you can remove any columns you do not intend on populating during the create task:

CSV file containing a row for every newly created node
In some situations, you may want to create stub nodes that only have a small subset of fields, and then populate the remaining fields later. To facilitate this type of workflow, Workbench provides an option to generate a simple CSV file containing a record for every node created during a create task. This file can then be used later in update tasks to add additional metadata or in add_media tasks to add media.
You tell Workbench to generate this file by including the optional output_csv setting in your create task configuration file. If this setting is present, Workbench will write a CSV file at the specified location containing one record per node created. This CSV file contains the following fields:
id(or whatever column is specified in yourid_fieldsetting): the value in your input CSV file's ID fieldnode_id: the node ID for the newly created nodeuuid: the new node's UUIDstatus: true if the node is published, False if it is unpublishedtitle: the node's title
The file will also contain empty columns corresponding to all of the fields in the target content type. An example, generated from a 2-record input CSV file, looks like this (only left-most part of the spreadsheet shown):

This CSV file is suitable as a template for subsequent update tasks, since it already contains the node_ids for all the stub nodes plus column headers for all of the fields in those nodes. You can remove from the template any columns you do not want to include in your update task. You can also use the node IDs in this file as the basis for later add_media tasks; all you will need to do is delete the other columns and add a file column containing the new nodes' corresponding filenames.
If you want to include in your output CSV all of the fields (and their values) from the input CSV, add output_csv_include_input_csv: true to your configuration file. This option is useful if you want a CSV that contains the node ID and a field such as field_identifier or other fields that contain local identifiers, DOIs, file paths, etc. If you use this option, all the fields from the input CSV are added to the output CSV; you cannot configure which fields are included.
CSV file containing field data for existing nodes
The export_csv task generates a CSV file that contains one row for each node identified in the input CSV file. The cells of the CSV are populated with data that is consistent with the structures that Workbench uses in update tasks. Using this CSV file, you can:
- see in one place all of the field values for nodes, which might be useful during quality assurance after a
createtask - modify the data and use it as input for an
updatetask using theupdate_mode: replaceconfiguration option.
The CSV file contains two of the extra rows included in the CSV file template, described above (specifically, the human-readable field label and number of values allowed), and the left-most "REMOVE THIS COLUMN (KEEP THIS ROW)" column. To use the file as input for an update task, simply delete the extraneous column and rows.
A sample configuration file for an export_csv task is:
task: export_csv
host: "http://localhost:8000"
username: admin
password: islandora
input_csv: nodes_to_export.csv
export_csv_term_mode: name
content_type: my_custom_content_type
# If export_csv_field_list is not present, all fields will be exported.
export_csv_field_list: ['title', 'field_description']
# Specifying the output path is optional; see below for more information.
export_csv_file_path: output.csv
The file identified by input_file has only one column, "node_id":
node_id
7653
7732
7653
Some things to note:
- The output includes data from nodes only, not media.
- Unless a file path is specified in the
export_csv_file_pathconfiguration option, the output CSV file name is the name of the input CSV file (containing node IDs) with ".csv_file_with_field_values" appended. For example, if youexport_csvconfiguration file defines theinput_csvas "my_export_nodes.csv", the CSV file created by the task will be named "my_export_nodes.csv.csv_file_with_field_values". The file is saved in the directory identified by theinput_dirconfiguration option. - You can include either vocabulary term IDs or term names (with accompanying vocabulary namespaces) in the CSV. By default, term IDs are included; to include term names instead, include
export_csv_term_mode: namein you configuration file. - A single
export_csvjob can only export nodes that have the content type identified in your Workbench configuration. By default, this is "islandora_object". If you include node IDs in your input file for nodes that have a different content type, Workbench will skip exporting their data and log the fact that it has done so. - If you don't want to export all the fields on a content type, you can list the fields you want to export in the
export_csv_field_listconfiguration option.
Warning
Using the export_csv_term_mode: name option will slow down the export, since Workbench must query Drupal to get the name of each term. The more taxonomy or typed relation fields in your content type, the slower the export will be with export_csv_term_mode set to "name".
Using a Drupal View to identify content to export as CSV
You can use a new or existing View to tell Workbench what nodes to export into CSV. This is done using a get_data_from_view task. A sample configuration file looks like this:
task: get_data_from_view
host: "http://localhost:8000/"
view_path: '/daily_nodes_created_test'
username: admin
password: islandora
content_type: pubished_work
export_csv_file_path: /tmp/islandora_export.csv
# If export_csv_field_list is not present, all fields will be exported.
# node_id and title are always included.
export_csv_field_list: ['field_description', 'field_extent']
# 'view_paramters' is optinal, and used only if your View uses Contextual Filters.
# In this setting you identify any URL parameters configured as Contextual Filters
# for the View. Note that values in the 'view_parameters' configuration setting
# are literal parameter=value strings that include the =, not YAML key: value
# pairs used elsewhere in the Workbench configuration file.
view_parameters:
 - 'date=20231202'
The view_path setting should contain the value of the "Path" option in the Views configuration page's "Path settings" section. The export_csv_file_path is the location where you want your CSV file saved.
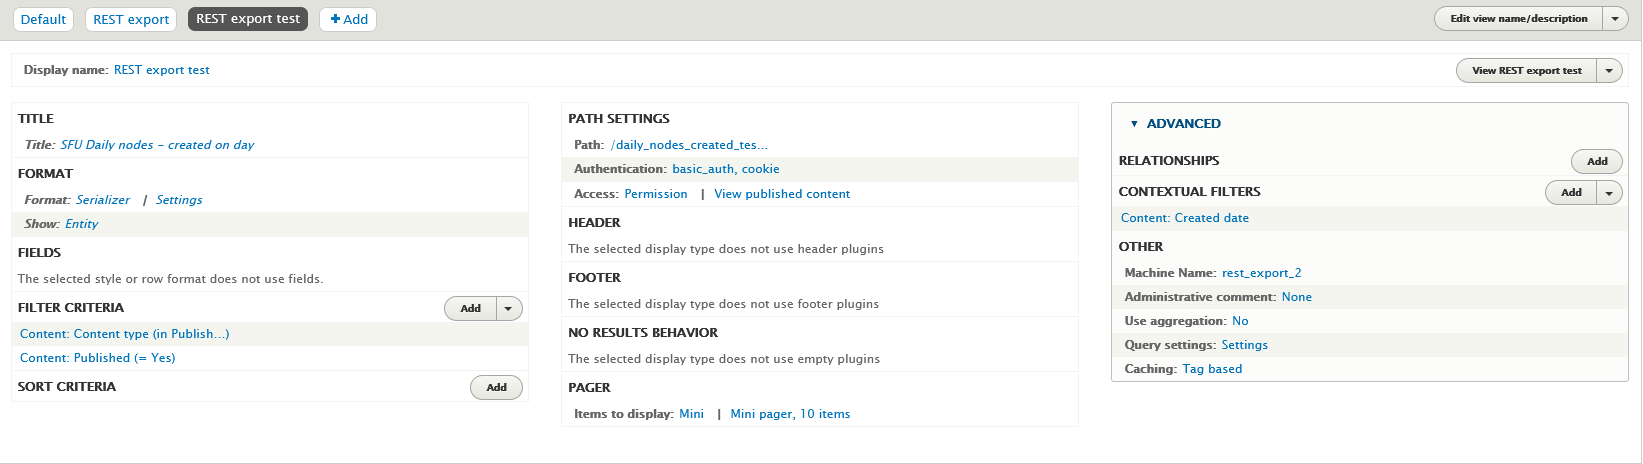
In the View configuration page:
- Add a "REST export" display.
- Under "Format" > "Serializer" > "Settings", choose "json".
- In the View "Fields" settings, leave "The selected style or row format does not use fields" as is (see explanation below).
- Under "Path", add a path where your REST export will be accessible to Workbench. As noted above, this value is also what you should use in the
view_pathsetting in your Workbench configuration file. - Under "Pager" > "Items to display", choose "Paged output, mini pager". In "Pager options" choose 10 items to display.
- Under "Path settings" > "Access", choose "Permission" and "View published content". Under "Authentication", choose "basic_auth" and "cookie".
Here is a screenshot illustrating these settings:
To test your REST export, in your browser, join your Drupal hostname and the "Path" defined in your View configuration. Using the values in the configuration file above, that would be http://localhost:8000/workbench-export-test. You should see raw JSON (or formatted JSON if your browser renders JSON to be human readable) that lists the nodes in your View.
Warning
If your View includes nodes that you do not want to be seen by anonymous users, or if it contains unpublished nodes, adjust the access permissions settings appropriately, and ensure that the user identified in your Workbench configuration file has sufficient permissions.
You can optionally configure your View to use a single Contextual Filters, and expose that Contextual Filter to use one or more query parameters. This way, you can include each query parameter's name and its value in your configuration file using Workbench's view_parameters config setting, as illustrated in the sample configuration file above. The configuration in the View's Contextual Filters for this type of parameter looks like this:
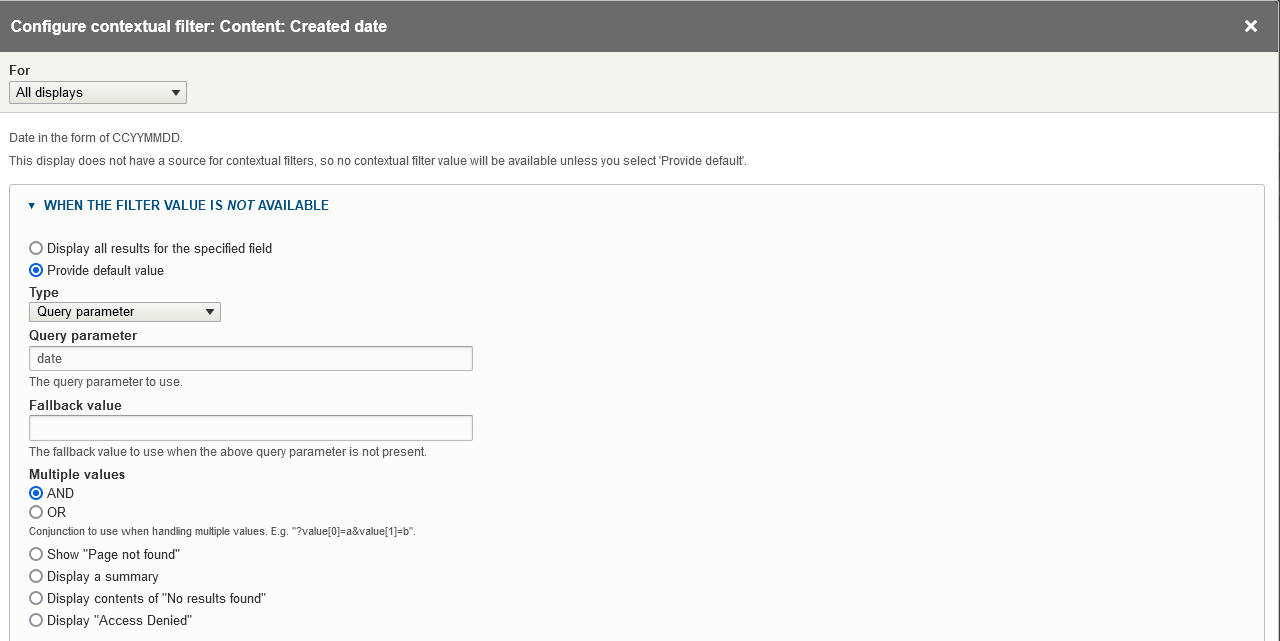
By adding a Contextual Filterf to your View display, you can control what nodes end up in the output CSV by including the value you want to filter on in your Workbench configuration's view_parameters setting. In the screenshot of the "Created date" Contextual Filter shown here, the query parameter is date, so you include that parameter in your view_parameters list in your configuration file along with the value you want to assign to the parameter (separated by an = sign), e.g.:
view_parameters:
 - 'date=20231202'
will set the value of the date query parameter in the "Created date" Contextual Filter to "20231202".
Some things to note:
- Note that the values you include in
view_parametersapply only to your View's Contextual Filter. Any "Filter Criteria" you include in the main part of your View configuration also take effect. In other words, both "Filter Criteria" and "Contextual Filters" determine what nodes end up in your output CSV file.- You can only include a single Contextual Filter in your View, but it can have multiple query parameters.
- REST export Views displays don't use fields in the same way that other Views displays do. In fact, Drupal says within the Views user interface that for REST export displays, "The selected style or row format does not use fields." Instead, these displays export the entire node in JSON format. Workbench iterates through all fields on the node JSON that start with
field_and includes those fields, plusnode_idandtitle, in the output CSV. - If you don't want to export all the fields on a content type, you can list the fields you want to export in the
export_csv_field_listconfiguration option. - Only content from nodes that have the content type identified in the
content_typeconfiguration setting will be written to the CSV file. - If you want to export term names instead of term IDs, include
export_csv_term_mode: namein your configuration file. The warning about this option slowing down the export applies to this task and theexport_csvtask.
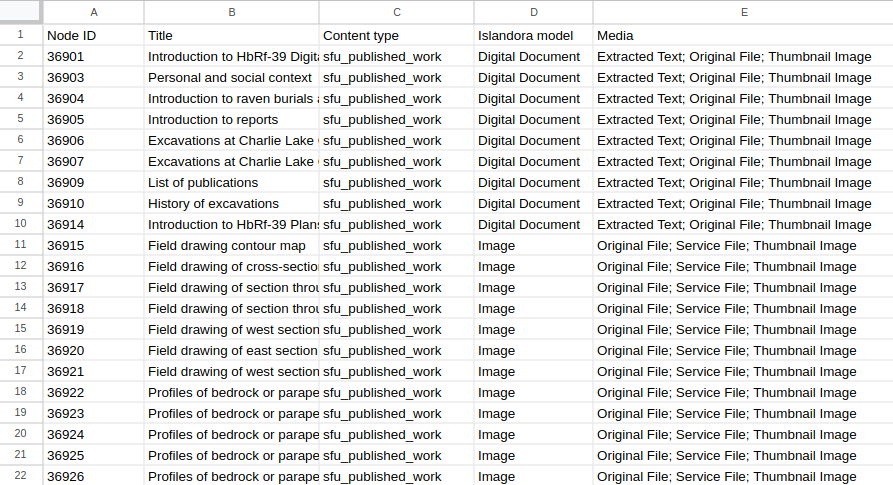
Using a Drupal View to generate a media report as CSV
You can get a report of which media a set of nodes has using a View. This report is generated using a get_media_report_from_view task, and the View configuration it uses is the same as the View configuration described above (in fact, you can use the same View with both get_data_from_view and get_media_report_from_view tasks). A sample Workbench configuration file looks like:
task: get_media_report_from_view
host: "http://localhost:8000/"
view_path: daily_nodes_created
username: admin
password: islandora
export_csv_file_path: /tmp/media_report.csv
# view_paramters is optinal, and used only if your View uses Contextual Filters.
view_parameters:
 - 'date=20231201'
The output contains colums for Node ID, Title, Content Type, Islandora Model, and Media. For each node in the View, the Media column contains the media use terms for all media attached to the node separated by semicolons, and sorted alphabetically:
Exporting image, video, etc. files along with CSV data
In export_csv and get_data_from_view tasks, you can optionally export media files. To do this, add the following settings to your configuration file:
export_file_directory: Required. This is the path to the directory where Workbench will save the exported files.export_file_media_use_term_id: Optional. This setting tells Workbench which Islandora Media Use term to use to identify the file to export. Defaults tohttp://pcdm.org/use#OriginalFile(for Original File). Can be either a term ID or a term URI.
Note that currently only a single file per node can be exported, and that files need to be accessible to the anonymous Drupal user to be exported.
Using the CSV ID to node ID map
By default, Workbench maintains a simple database that maps values in your CSV's ID column (or whatever column you define in the id_field config setting) to node IDs created in create tasks.
Note
You do not need to install anything extra for Workbench to create this database. Workbench provides a utility script, manage_csv_to_node_id_map.py (described below), for exporting and pruning the data. You only need to install the sqlite3 client or a third-party utility if you want to access the database in ways that surpass the capabilities of the manage_csv_to_node_id_map.py script.
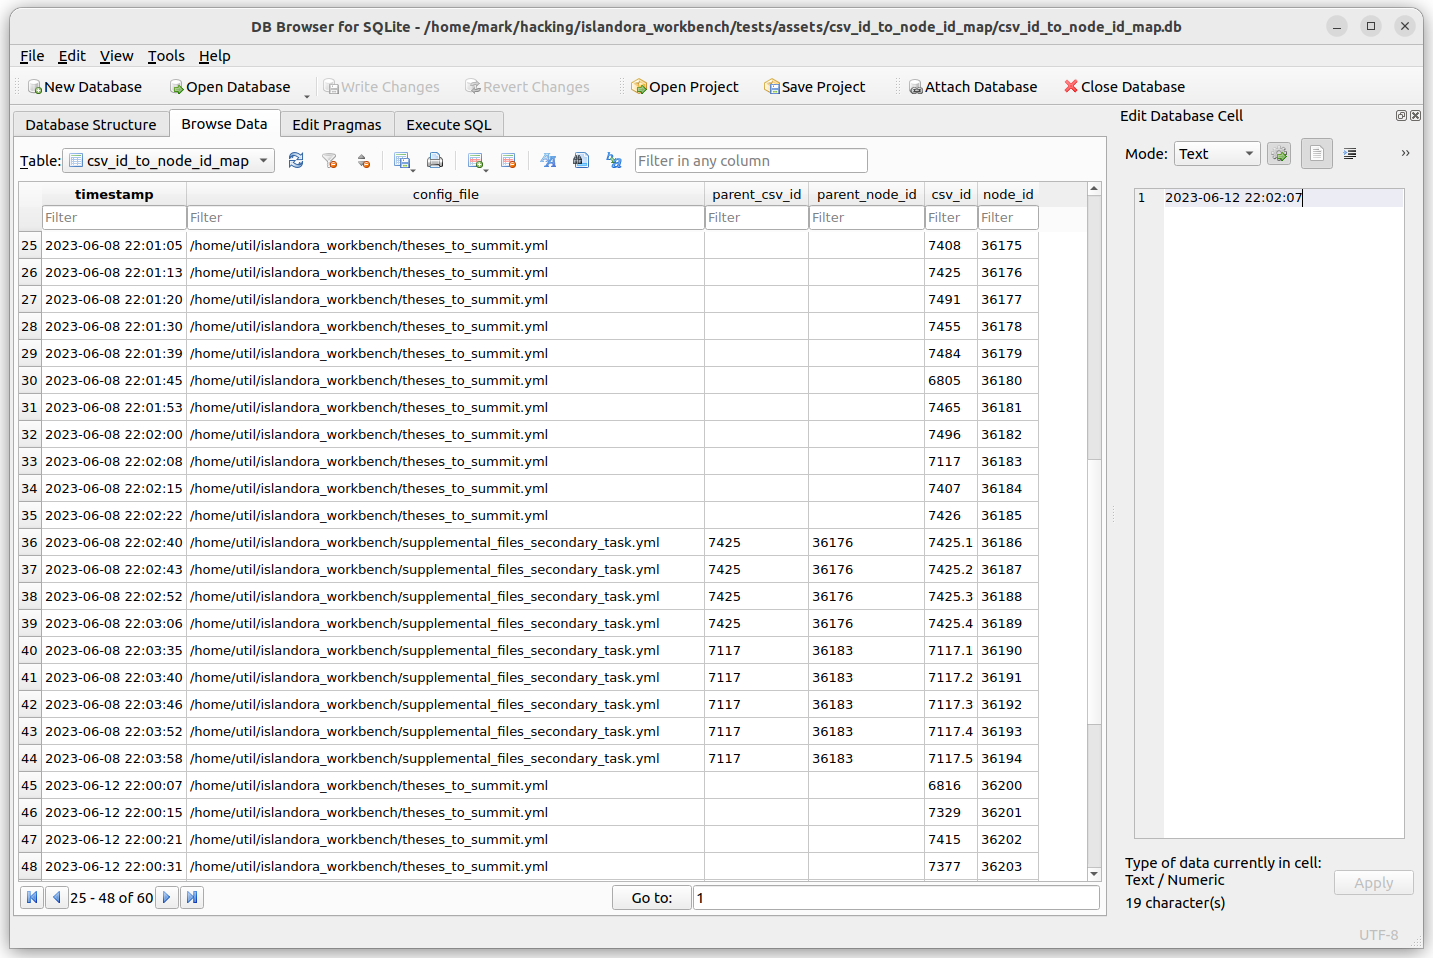
A useful third-party tool for viewing and modifying SQLite databases is DB Browser for SQLite. Here is a sample screenshot illustrating the CSV to node ID map database table in DB Browser for SQLite (CSV ID and node ID are the two right-most columns):
Workbench optionally uses this database to determine the node ID of parent nodes when creating paged and compound content, so, for example, you can use parent_id values in your input CSV that refer to parents created in earlier Workbench sessions. But, you may find other uses for this data. Since it is stored in an SQLite database, it can be queried using SQL, or can be dumped using into a CSV file using the dump_id_map.py script provided in Workbench's scripts directory.
Note
In create_from_files tasks, which don't use an input CSV file, the filename is recorded instead of an "id".
One configuration setting applies to this feature, csv_id_to_node_id_map_path. By default, its value is [your temporary directory]/csv_id_to_node_id_map.db (see the temp_dir config setting's documentation for more information on where that directory is). This default can be overridden in your config file. If you want to disable population of this database completely, set csv_id_to_node_id_map_path to false.
Warning
Some systems clear out their temporary directories on restart. You may want to define the absolute path to your ID map database in the csv_id_to_node_id_map_path configuration setting so it is stored in a location that will not get deleted on system restart.
The SQLite database contains one table, "csv_id_to_node_id_map". This table has five columns:
timestamp: the current timestamp inyyyy-mm-dd hh:mm:ssformat or a truncated version of that formatconfig_file: the name of the Workbench configuration file active when the row was addedparent_csv_id: if the node was created along with its parent, the parent's CSV IDparent_node_id: if the node was create along with its parent, the parent's node IDcsv_id: the value in the node's CSV ID field (or increate_from_filestasks, which don't use an input CSV file, the filename)node_id: the node's Drupal node ID
If you don't want to query the database directly, you can use scripts/manage_csv_to_node_id_map.py to:
- Export the contents of the entire database to a CSV file.
- To do this, in the Workbench directory, run the script, specifying the path to the database file and the path to the CSV output:
python scripts/manage_csv_to_node_id_map.py --db_path /tmp/csv_id_to_node_id_map.db --csv_path /tmp/output.csv
- To do this, in the Workbench directory, run the script, specifying the path to the database file and the path to the CSV output:
- Export the rows that have duplicate (i.e., identical) CSV ID values, or duplicate values in any specific field.
- To limit the rows that are dumped to those with duplicate values in a specific database field, add the
--nonuniqueargument and the name of the field, e.g.,--nonunique csv_id. The resulting CSV will only contain those entries from your database.
- To limit the rows that are dumped to those with duplicate values in a specific database field, add the
- Delete entries from the database that have a specific value in their
config_filecolumn.- To do this, provide the script with the
--remove_entries_with_config_filesargument, e.g.,python scripts/manage_csv_to_node_id_map.py --db_path csv_id_to_node_id_map.db --remove_entries_with_config_files create.yml. You can also specify a comma-separated list of config file names (for example--remove_entries_with_config_files create.yml,create_testing.yml) to remove all entries with those config file names with one command.
- To do this, provide the script with the
- Delete entries from the database create before a specific date.
- To do this, provide the script with the
--remove_entries_beforeargument, e.g.,python scripts/manage_csv_to_node_id_map.py --db_path csv_id_to_node_id_map.db --remove_entries_before "2023-05-29 19:17".
- To do this, provide the script with the
- Delete entries from the database created after a specific date.
- To do this, provide the script with the
--remove_entries_afterargument, e.g.,python scripts/manage_csv_to_node_id_map.py --db_path csv_id_to_node_id_map.db --remove_entries_after "2023-05-29 19:17".
- To do this, provide the script with the
The value of the --remove_entries_before and --remove_entries_after arguments is a date string that can take the form yyyy-mm-dd hh:mm:ss or any truncated version of that format, e.g. yyyy-mm-dd hh:mm, yyyy-mm-dd hh, or yyyy-mm-dd. Any rows in the database table that have a timestamp value that matches the date value will be deleted from the database. Note that if your timestamp value has a space in it, you need to wrap it quotation marks as illustrated above; if you don't, the script will delete all the entries on the timestamp value before the space, in other words, that day.